Not the fastest or cleanest lap ever, but its ok. Tires are getting old, and this was the last track day before the AST dampers were serviced to change body length and valving.
Video shot on iPhone 4S with an igloo case and Harry’s Lap Timer app.

Not the fastest or cleanest lap ever, but its ok. Tires are getting old, and this was the last track day before the AST dampers were serviced to change body length and valving.
Video shot on iPhone 4S with an igloo case and Harry’s Lap Timer app.
Today, I took the car to Buttonwillow for Redline Time Attack’s (re)opening event. It rained last night and periodically during the day. Which made for a fun, slick track, even when it was dry. So time’s weren’t all that great, but driving in the rain isn’t something you get to do much in SoCal. This lap had some imperfections, but was good enough for 3rd.
Turn out was good. Looked like about 100 cars between the competitors and the “xtremespeed” track day attendees. I think there were several people like me, who had run with Redline in their prime, and were curious to see what this event would be like. There weren’t a bunch of high profile cars – mostly grassroots guys and a couple shop cars. To me, that was refreshing as its where time attack began. I’m a little over the big vinyled up crazy evos, stis, S2k’s and NSX’s. To me, for the health of time trials / time attack / solo or what ever you want to call it, organizers need to focus on getting crowds like this out to the track. It was a mix between track regulars and some that likely wouldn’t have come if it was called something less likely to be sponsored by an energy drink. These tracks and locations are never going to attract big spectator crowds, and print media that has covered these events in the past matters a lot less now compared to years ago. If today was any indication of what next year will bring, there is hope yet for time attack in the US. Results should be up soon at www.redlinetimeattack.com .
Check out the video. Make sure to watch it in Hi Def as the default resolution isn’t that great. The data overlay was done with the Harry’s Laptimer app available in the App store, and video was shot with an iPhone 4s using an Igloo Case. Available for $59 on www.igloocase.com
Like us on Facebook.
I’ve had these videos on my youtube page for a bit, but thought I needed to consolidate them here as I’ve tried to be committed to show the performance change driven by incremental changes to the car.
I posted this baseline video before, but here it is again so its all in the same thread. Roughly 169whp / 141 tq with STD correction factor out of the box. On track, ignoring the lack of power, the exhaust causes a problem because you can’t hear it from the cabin. I use exhaust tone to know when to shift, and I found myself banging off the rev limiter when I carried more speed and hadn’t realized it.
First change we made was the Berk catalyst free mid pipe. It is refreshing to work with aftermarket pieces that just fit. Berk obviously spent a lot of time to make sure this fit like a stock piece. There was no need to tweak or bend brackets or hangers to put this in. Berk also included a classy drawing to show how the flex doughnut should be installed to ensure that the exhaust wouldn’t put undo torque on other weld joints in the exhaust system – just like the stock piece.
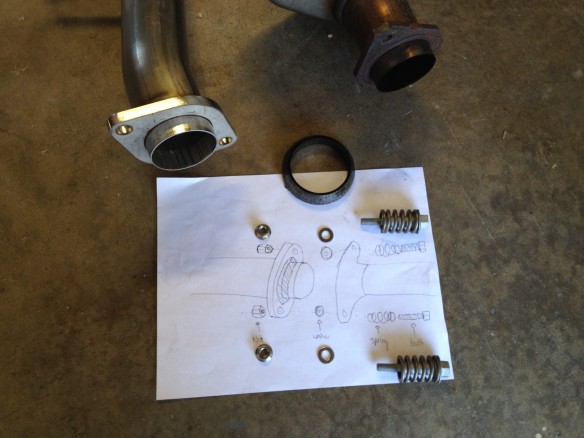
Berk didn’t trust me to be able to put the pipe in correctly, so they were kind enough to draw me a diagram.
The mid pipe by itself wakes up the car to the tune of 4-5whp and 5 tq. Some cars have gotten as much as 7whp out of this piece. I don’t think a 2 whp variance is statistically significant but it is what it is. It is a little louder, but not by much.
The last addition for this blog entry is the Berk track pipe. This essentially is a straight pipe that has finished exhaust tips on it. It shaves roughly 20lbs off the back of the car. The stock exhaust can is surprisingly light. From the look of it I would have assumed it was a 40+ lb piece.
This part didn’t contribute any power gains on my car. But on the same dyno, it has made 2-3 on other cars. Not sure why my car isn’t responding like other cars on the dyno. But the reality is, this part has value beyond a power adder and weight loss. It actually wakes the car up so you can hear it. It is loud, but not ridiculously so. It may not pass the 95 dB sound restriction days at Laguna Seca, but it is about the same volume as 90% of the S2000s you see at track days in socal. I’ll drive to and from the track with this piece and not think twice. Here is a dyno pull with the track pipe installed:
Here is a dyno comparing start point and end point. I suspect that in order to really wake the car up the ecu needs to be flashed. The dyno pulls are almost too consistent one to the next. I wonder if the FR-S is like many current BMWs were there is a torque and HP calculation done by the computer that plays with fuel and timing to hit target output levels no matter the potential. If any one knows the answer to this, please comment. Runs 4 and 5 in the picture below are of the baseline. Runs 6 and 7 are with the midpipe. I didn’t include the ones for the track pipe because they didn’t effect the curves on this car.
 And as always, videos are taken with the aid of an Igloo Case for the iPhone 4 or 5. The initial shipment of cases is almost sold out! But they are now available through the following vendors: Gear Co-Op, Boostlogic, and select Ripcurl retail outlets.
Like us on Facebook.
https://www.facebook.com/FECompetition
https://www.facebook.com/igloocase
Not the fastest lap of the day. And you can tell how slow the car is in a straightline. It takes a while for the traffic to start to pass me, but when they go by in a straight line you can tell the hp differential.
I’m sitting on a worn pleather seat at 10,000ft above sea level. I’m loosing the battle for the armrest. I’ve spent way more time in this uncomfortable seat than I care to think about in the last couple weeks since I installed the Essex brake kit on the FR-S. I’ve gotten a lot of emails and PM’s asking for track feedback. I need to edit the video of the day at Autoclub Speedway in Fontana. The best footage I have was unfortunately interrupted by the now infamous McLaren loosing a fight with a cement retaining wall. This is basically a really elaborate excuse for a blog post without a ton of pictures and video to back it up.
In previous posts, I suggested that the biggest advantage of the Essex brake kit was the 20lbs it sheds. And this is indeed a big advantage. I changed over to these brakes before I tested the limits of the stock system. But I have watched others on track with me or that post online, and it has become pretty clear that the stock braking system can not handle a lot of track duty. Rotors show significant ware after a couple days (I know of 2 that have cracked on the 5th and 6th track days). And pads aren’t lasting that long. A set of XP10 Carbotechs lasted a friend 3 track days. I would expect that on a heavy car, but this surprised me here. The cost of consumables in the brake system is higher than I anticipated on this car. If you decide to keep the stock brakes for a while and you visit the track frequently, you need to set up a duct system to try and see if you can get some more life out of the stock parts.
My initial impressions of the Essex brakes are as follows:
You can feel the loss of 20lbs of unsprung weight. Turn in is a bit more crisp, and steering feedback is improved. This is important for me as the addition of 255s did make the steering a bit more numb than stock. The stock liveliness has now returned, but now with monster grip. The stock pedal felt great before you got a lot heat into the system. But as temps went up, a numbness crept in that while the brakes were effective, it was hard to tell when ABS was engaging and when you were simply at the threshold. Earlier I suggested this was tread squirm on the Hankook RS3’s. This was only partially true. The Essex brakes allow for the same great pedal feel and articulation of the cool stock brakes to be carried deeper into the on track session. The tires do overheat and don’t like to communicate under threshold braking like a proper race tire does. But the larger system retains pedal feel that was lost in the OEM configuration. I look forward to trying a treaded R comp tire to fully understand what is tire feedback and what is brake system sensitivity. I suspect the Essex kit will further distance itself from the stock system with proper rubber. While I did not have heat paint on rotors or stickers on the calipers, it is pretty evident that these brakes stay cooler than the stock units which will lead to extended life of parts.
Brake bias is similar to stock. I am running AP C300 pads in the front (Essex recommended) and Carbotech XP8 in the rear (not Essex recommended). Essex recommends a balanced approach to pads running the same front and rear. The hot setup on miatas is different than that, and its what I tried. I think I could fine tune the system with a pad change, but here are my current observations. There is more front bias than when I was running stock fronts with Carbotech XP10s. For street driving or novice track driving, this is a fine combo. There is a hair more front bias with the current pad set up than I prefer in a race car in the dry. But I suspect in the rain, this is just how I would have things adjusted. I believe I will swap the rear pads to something with a higher coefficient of friction in the near future. I like a car that will rotate quickly under trail braking, and I don’t mind if it is a little twitchy making transitions on different types of pavement while threshold braking. You aren’t likely to spin a FR-S with this kit and pad set up under braking. The way the car is setup now is easy to drive, it just might not be extracting all of the potential out of the system as the rear brakes aren’t doing as much work as they could.
A pleasant bonus for this upgrade is how it interacts with the ABS system. The stock ABS system in the FR-S rivals that of the S2000, which in my opinion is one of the best systems available in reasonably priced sports cars. And the Essex caliper and piston choices I think have improved upon it. With a little practice, you can feel the ABS engagement point, and it is easy to modulate in and out of its use which when the OEM units got hot became difficult to do. ABS engagement doesn’t upset the car and its not so violent that it interrupts your concentration.
The only thing that caught me a little unprepared is the wrench required to bleed your fluid. The recess in which the bleeder sits has ridges around it that require a very thin crescent wrench. A standard one won’t allow you to effectively open and close the nipple. If this however is the biggest issue I can find with the brake kit, this is going to be a success. $2500 for 20 lbs of unsprung weight falls into the “bargain” category when it comes to performance weight loss. Now if someone would only offer a 2 piece rotor for the rear.
So in current configuration, at Autoclub Speedway’s oval, the car turned 2:01’s in the morning session. Its probably a sub 2 minute car when you tighten the nut behind the wheel a little. Considering the car can be driven with the gas pedal all the way on the floor through the banking and the car never goes more than 122mi/hr, that is pretty quick. It could use a little more power. I’ve got a short video ready to upload once I get to a larger bandwidth connection.
It’s been too long since my last update. I think I have sensationalized being “first” to do things in a new chassis. The reality is being first is frustrating. Being first shockingly means no one has done it before. I know it’s obvious when I say it like that, but it wasn’t so obvious when I was thinking about how cool it is to be “first”. It also means there are very few companies out there that can actually help you accomplish what ever it is you are trying to accomplish “first”. I haven’t posted much as unless you are doing something completely custom, there isn’t a ton available for these cars that I think is of a high quality that improves the overall performance package.
In my last post, I put up a baseline dyno. I’ve since added a Berk midpipe, but for a myriad of reasons, I haven’t gotten the updated dyno, but I will. This update will focuses on what you should be working on before you add power anyway – brakes.
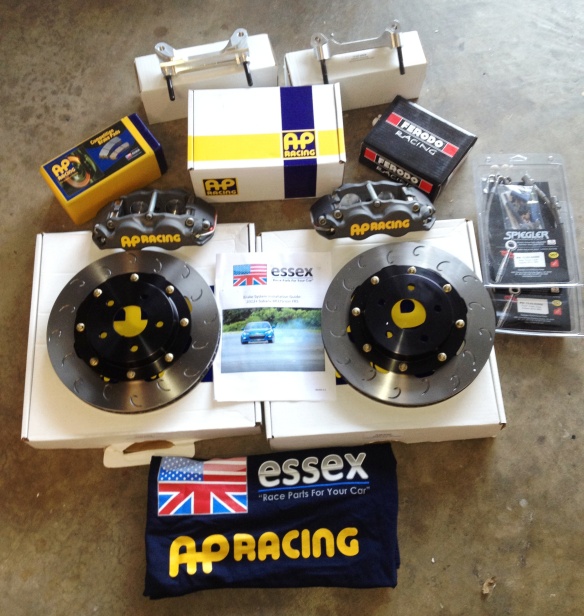
What was hidden under all the packing peanuts: Rotors, 2 sets of pads, calipers, brake lines, and brackets.
Essex Parts is in NASCAR country. Based in North Carolina, they supply equipment to pro teams and grassroots ones alike. They have developed 2 front axle brake systems for the FT86 of varying sizes leveraging the AP Racing parts bin.
Their Endurance kit is a significantly larger J hook rotor that requires a 18” wheel. While the mammoth rotor looks cool, I have yet to see a FR-S in development that needs this much heat dissipation. The smaller of the two kits is the Sprint system. Its rotor is only 11.75” in diameter – only a hair bigger than stock.

The difference in vane size and rotor width is obvious. Bigger vanes of this design with pump more cool air through the brakes at speed.
The significant upgrade from OEM comes from the width of the rotor and the sophistication of the cooling vanes. The stock system with Carbotech XP10s handled the track fine. The pedal feel wasn’t great after a couple laps on 100 degree days, but that was likely related to tread squirm on the Hankook RS3s. After a single day, however, the outer edges of the stock rotors were white. This suggests they got extremely hot which usually leads to shorter rotor life and cracking. Replacement rotors however only cost ~$50 a corner, so you could go through a lot of them before the Essex brakes become the smart financial decision based simply on longevity.
Ignore the AP Racing 4 piston calipers and the high end rotors, the Sprint kit should be attractive to performance junkies for one reason. They shave 10 pounds of unsprung weight off each corner of the car. The loss of this weight gives better steering feel, even on the street. For performance calculations, every pound of unsprung weight is the equivalent to about 7 sprung pounds. So the loss of 20 lbs off the braking system is the same performance differential of ditching a passenger from the cabin.
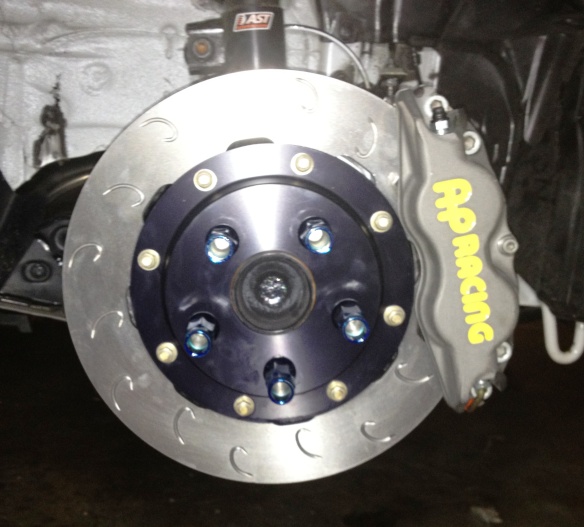
Every other silver painted caliper I’ve ever had has turned brown with heat. I look forward to trying to do the same thing to these.
The installation of this kit requires only a basic tool set that includes metric crescent wrenches and sockets with the exception of a torque wrench, a 10mm hex key, and the bizarre requirement of a unibit. My intention was to provide step by step instructions on how to install the system, but I was really impressed with what Essex included. They were very detailed and explained everything step by step. Consequently, I won’t make redundant their work. The only real issues not anticipated by the instructions were the following:
This particular car had undercoating or a rubberized sealer sprayed on the brake hardline threaded connector. Consequently, the threads were gummed up and these 10mm flare fittings stripped when just using a crescent wrench. I ended up soaking the fittings with brake cleaner and using channel locks to get them to brake free. An annoying complication, but this issue potentially wouldn’t exist in other chassis if the undercoating or sealer wasn’t applied in this manner.
2. When the new steel braided line was being installed, I discovered that the female fitting that attaches to the OEM hardline does not fit through the stamped steel bracket designed to secure the brake lines to the chassis. As you can see from the picture, the hole size is close to the same, but unfortunately, not close enough. The fix was to unbolt the bracket from the car and use a unibit to drill it out. To be clear, I don’t really see this as an Essex issue as much as one of the supplier of their brake lines. When I raised this issue to Essex, they quickly looked into it and are making adjustments to the future kits that get shipped to customers. So I suspect this won’t happen to other buyers.
One of the benefits I probably wouldn’t have paid for, but really appreciate is how easy pad swaps are. By removing the single dowel pin with a hex key, you simply slide the old pads out, and put the new pads in. I’ve been too lazy to swap pads on the stock calipers, so I’ve been running around with loud and dusty race pads on the street. These calipers will make the swap to street pads a snap, so I’ll be more likely to do it.
Next stop is the race track. Sunday the 7th at AutoClub Speedway in Fontana is a www.Speedventures.com track day where we will put these through their paces. At the same time is “86 Fest”. I’m not a car show guy, but I do appreciate vendors and others supporting a car I’m interested in. During this event we will also be the releasing the IglooCase (ww.igloocase.com). This case encloses your iPhone and adds a lens and camera mount. Prototype versions have been around for a season, but we just received our first 300 production pieces this week. The cases will be order-able off the website in the week of 10/7/12. At $59 plus a mount, it’s a cost effective alternative to a contour or go pro if you already own an iPhone. I’ve called this product the title sponsor of this car, but the reality is its way more personal than that as I’m one of its creators. Come by and check it out if you are at the track Sunday. I’ll be under the 949Racing tent.
Get more updates at:
I’m getting old, or I’m becoming a baby. One of the two extremes. Its really hot in the desert in August here in California, so getting on track for more testing is kind of miserable. Not the most riveting update, I admit, but here are a couple quick things happening with the car:
1. When I said the 255/40/17 Hankook RS3’s fit perfect on the 17×9’s with a 42mm offset I was right. When I said they didn’t rub, well, that was a stretch. Or rather not enough of a stretch of the tires I guess. Its really minor, but at full lock, I’m eating away the plastic fender liners.
2. Went to the dyno today in order to have a solid baseline. Like with our suspension modifications, I want to make sure I can demonstrate what each individual part does. I recognize the sum of the parts may eventually be greater than measuring each one individually, but this is a place to start.
Here are the results: 170 whp, 141tq
3. In the idle time, I’m starting to plan the aero package for the car. Lots in the works, but for not, I’m working on the underside of the car making templates with plywood. Right now it looks like a hill climb car. If only it had enough power to overcome the drag created by something like this…

how many comments would I get if I didn’t say this was just the template in plywood and I was ignoring the exterior shape?
I should have a more substantial update soon. Lots going on behind the scenes on bolt on power, brakes, and aerodynamics. I’ll have something to share soon.
 Last weekend (July 28 & 29) was the first time on track with the FR-S. We went to buttonwillow raceway to run clockwise config 13 – the yardstick for lap times on the west coast. We had a pretty ambitious schedule as we were not only putting the car on the track for the first time, but we also were testing incremental improvements. Which meant crawling around under the car in the summer desert heat to make changes to the car. I;m not referring to myself in the plural 3rd person, I actually had help. Big thanks to the folks at 949 racing for being track side to help make the changes and assist in set up. I’m pretty sure I wouldn’t have been able to accomplish all of the rounds of testing that we did if I was by myself. They have a lot of interest in these cars, and have started carrying parts for them. Check out their racing blog: http://949racing.blogspot.com/
The timed results below were with Emilio of 949 driving. He got more out of the car on this weekend than I did. Hats off to him. He’s fast and never put a wheel wrong with little seat time. We recorded tire pressures, pyrometer readings, damper travel, gps data and timing. We combined this with alignment and driver feedback to start building our own setup manual.
Test 1: Baseline – 2:12.1
We needed to know what the car did straight off the showroom floor. The only change we made was brake pads before our first run. We decided a stock pad test was pointless considering the ambient heat of the weekend. I just wasn’t willing to trash parts we knew wouldn’t be up to the task. We installed Carbotech XP10 (front) and XP8 (rear) before we got the the track. I bedded them late at night on the drive out of LA on the way to the track. Nothing like 80 to 20mph braking runs over and over until you can smell the melting pad material transferring material to the rotors.
Stock alignment includes an average of -.3 degrees camber in the front and it showed. The pyrometer data shows that we’re destroying the outer shoulder of the stock wooden wagon wheels and the insides aren’t sharing the burden. This is to be expected with this little amount of camber. The car is fun to drive this way, and pretty well balanced, but mushes its way around the track. Not sure why these tires were picked for the chassis from the factory.
Tread squirm overheated the tires really quickly. There isn’t very much braking feel coming through the pedal in this config. I attribute this again to the non-track oriented tires and having way more brake pad than rubber on the ground.
The car has a pretty big tendency to oversteer stock when you get close to the limits. Driving at 8/10ths the car does what you want it to. But if you are trying for the penultimate lap it is not very forgiving. It never puts you in danger, but the car starts to rotate slowing you down. Messing with tire pressures helped this some, but in our experience when you tune out the high speed oversteer, a low speed understeer starts to show up when the car is pushed. This criticisms are minor in light of how good the car is stock. Out of the box, this is one of the most well balanced and fun cars to drive on the track I have ever driven.
Test 2: wheels, tires, and crash bolts – 2:07.1
 In a previous post, I went through wheel selection for this car. We are using 17×9 hub centric Mach V wheels. They weight 17.8s, and there simply isn’t anything else on the market that meets all these specs. I’ve painted them blue instead of powder coating them, and may outline in another post how I did this. We’ve mounted 255/40/17 Hankook RS3’s on them. Sometimes hellafunctional and hellaflush cross over. This is one of those instances. I noticed after we returned home that the rears just barely touched the rolled fenders. Nothing dangerous – just enough to discolor the tire.
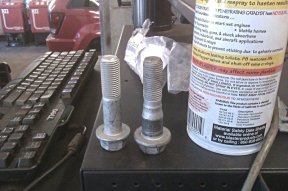
So you can visualize the difference, here is a stock strut bolt next to the smaller one that creates camber
We also installed factory crashbolts for the impreza (part # 20540AA090 at a subaru dealer). All these are is a bolt with a thinner shaft diameter so there is some slop between the suspension upright and the damper. This slop allows you to tilt the top of the hub and wheel inboard creating more static camber. These bolts gave us an average of .7 degrees of camber gain in the front (total of 1 degree). 1 degree clearly isn’t enough for the soft sidewall of the RS3s that really like to roll over, but it was a start, and helped us get the front tires to clear the fenders.
The addition of the larger tires calmed the oversteer at the limit. 5 years ago, the fastest street tires were only good for a lap before they overheated. the RS3s soak up as much heat as you can create on an almost 100 degree day lap after lap.
The only weakness is that braking feel isn’t as good as traditional r compounds when they heat up, but way better than the stock tires. In this configuration, the car has way more grip than it does suspension control. Its fast, but sways through corners in a manner that isn’t confidence inspiring when trying to go fast. But to pick up 6 seconds in tires and a little front camber is pretty staggering.
Test 3: AST prototype dampers- 2:03.75
AST has just released their newest damper technology – the 4150 series. (http://www.ast-usa.com/) Our test day included not only the first prototype of AST’s designed for the FR-S, but also one of the first examples of the 4150 damper internals in use in the US. We sourced tophats from other vendors to get these dampers on the car in time for this weekend. (Vorshlag adjustable ones in the front, and OEM WRX rear ones) Our goal was to ensure fitment and figure out what “works” on the track and street.
We installed them in the garage at Buttonwillow while the thermostat said it was 99 degrees in the shade. Stock damper removal on this chassis is a breeze. The front struts fall right out with the removal of 5 bolts (plus the sway bar endlink and disconnecting the abs sensor and brake line), and the rears don’t even require disconnecting the sway bar to come out. Very refreshing compared to other small cars on the market today.
The whole swap took less than an hour plus time to realign and corner balance. We lowered the car about 3/4″ and got decent cross weights on the car. For those that care about these things, the cross weight changed only about .1% when you add a 175lb driver. We didn’t play with the alignment after the first install, and there is probably a little more time in the setup from getting this just right.
Out of the box, dampers and front alignment made about 3.5 seconds. My earlier complaints of unpredictability and lack of balance at the limit are gone. Other dampers may have more adjustment knobs and other bells and whistles, but there is something really nice about simplicity that works. You can actually tell a difference with each of the 12 clicks the AST monotubes make to the ride. We were able to balance the chassis with these. While it wasn’t the fastest way around the track, more than once we had a very controllable oversteer slide at 90 mi/hr through the riverside turn (high speed right hand sweeper). It soaks up pavement transitions and imperfections in a manner the stock ride couldn’t. You can hammer over most of the track bumpers without upsetting the chassis a huge amount. And while this was a track focused test, the spring rates we chose rode almost like stock when the damper valving was set to its softest settings.
The feedback document we provided to AST will be incorporated into the final design. I think this will prove to be a competitive advantage for AST. There were some things discovered through our testing that I don’t think manufactures could account for without real track testing and and data. After this test, I’m a little skeptical of other dampers that are on the market that never saw the track before being released. You can only fine tune a design so much from behind a computer. After the AST design is finalized and on the market, I’ll point out some of those differences and talk about spring rates, etc. Sorry for being cloak and dagger about it. I look forward to seeing these on the market so that others can provide feedback as well.
Final thoughts:
 Going to the track in this sort of heat really beats on cars and drivers. The FR-S only has a water temp sensor that never moved from the safe zone throughout the whole weekend. But I suspect there is a dead spot in the middle of the dial from which it won’t move until things get really hot. I hope to get an oil temp sensor in the car in the near future to see what is really going on. The car now turns hard enough that the stock seat isn’t really sufficient. I left with a sore left knee from holding myself up against the door, which means a more supportive seat is needed. I’m not quite sure how to handle this with the desire to keep the car street comfortable yet.
I posted a quick video in the previous blog entry, and will put another one up in a bit when I have a moment to edit. Admittedly, the focus for the weekend was collecting data and consequently, the cameras weren’t always in the car, or always on, etc. Photo credit here goes to Vanhap Photography. With little time to do more than take a shot with a point and shoot, its always good to have a local pro hanging around for beauty shots.
Want to see additional updates? Follow FE Competition on Facebook: https://www.facebook.com/FECompetition
This is admittedly not the best video. I was testing new camera locations. This was filmed on the same weekend we were testing dampers, tires, and brake pads. So there was a lot more focus on getting the car together than getting quality video content.
A couple days ago, I took the nose off the car, and took the intake system out. I did this for measurements for future projects. I wanted to take a look at different intake routes to free up space between the engine and the radiator, and I wanted to look at practical mounts for oil coolers and splitters. I figured others might want to see the pictures so they wouldn’t have to take their car apart to see under the skin. I won’t be writing a big story, just posting up the pics.
For those that want to take the nose off themselves, its really pretty easy. you have about 7 10mm blots on top and bottom of the nose, and a bunch of little plastic push rivets which you need a flat head screwdriver to remove. The only tricky ones are the ones inside the corner marker housings. Not sure why they are designed this way, as they were a pain to get out. But if I were to do it again, now that I know how I think I could have the bumper off in 10 mins.

as a point of reference, here is the fully dressed engine bay. I know those resonance chambers are there for a reason, but there is a ton of plastic taking up valuable space between the engine and the radiator.

similar shot, just no intake plumbing. Lots of room. Subaru already leaned the top of the radiator forward, so there is more space at the top than at the bottom.
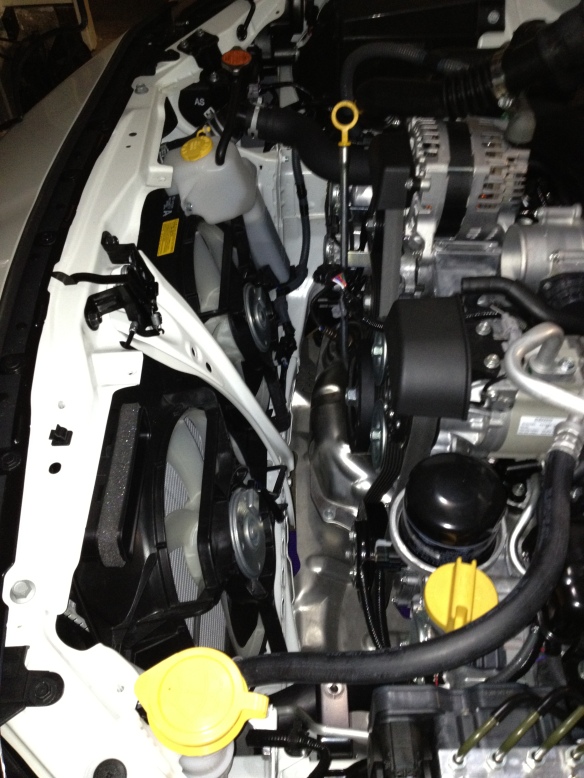
Here is a better angle to see the lean of the radiator. Fans are relatively slim lined. No idea on the CFM they push, but as you’ll see in later pics, the radiator is pretty well sealed from the front, so this shouldn’t be an issue.
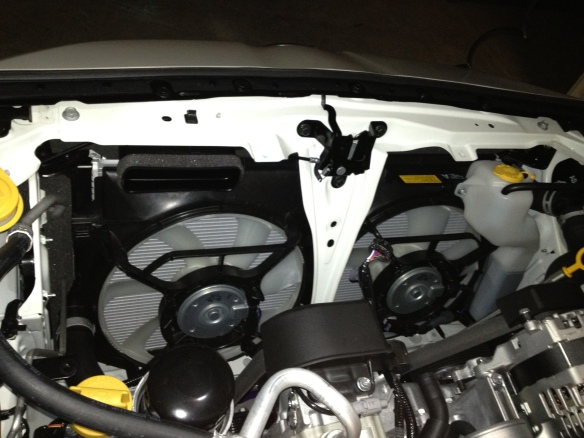
Better shot of the radiator and the air intake. You can see if going over the radiator on the left side. Any shop out there want to collaborate on an intake tube that uses the same passageway?

up close shot of the intake snorkel from the front side of the radiator. Lots of thought went into this. But if you want all the mess from behind the radiator to be tossed, I think this has to go.
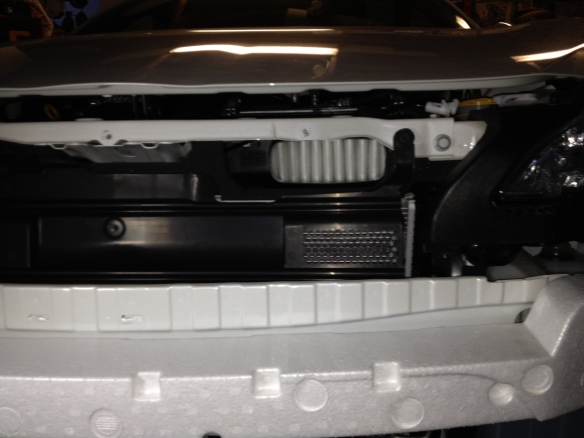
Here is the opening where that intake snorkel was. The airbox is on the other side during this photo, so you can see the paper filter.

from the drivers side without the nose. You can see how far the bumper beam extends. Looks like a great place to suspend the splitter from in the future. And water weighs what? 7lbs/gallon? looks like there is 7 pounds of windshield washer fluid to come off the nose of the car when it comes time to try and remove the lbs…
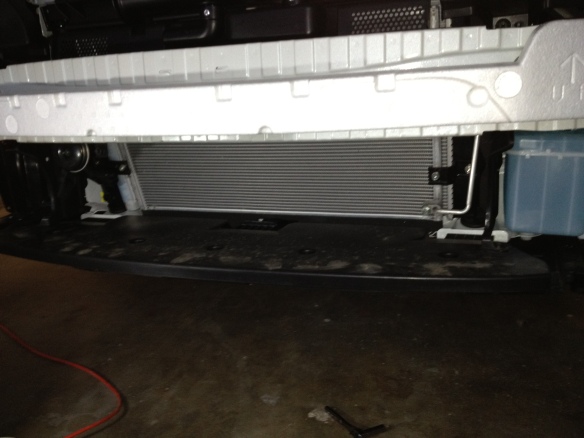
really nice plastic shrouding of the radiator. The bottom panel especially. You can see the sides that keep the air from escaping around the radiator here as well. I’ll be curious to see water and oil temps at the track in 2 weeks…

here is the inside of the nose. Looks like the plastic rock guard will just snap right out if we wanted to remove it. The upper 3rd doesn’t even let air through, so if we need better airflow, that might be the answer.
That’s it for now. If you want to follow the progress: